Living Willow from Willows Nursery
How to make a living willow fedge(More detailed instructions are sent with the kits)
Please visit our ‘Living Willow Fedge Gallery’ to see more photographs of Fedges.
Please visit our Living Willow Kit Prices page for full details of the kits
we offer and see our FAQ’s page for further information and advice

Our Standard Fedge Kits are based on 6 inch (15 cm) spacing between whips – that is, one foot (30 cm) spacing
between the whips planted on the same diagonal and then planting those on the other diagonal in between.
Allowing for 6 to 9 inches (15 to 23 cm) to go into the ground to root and depending on how steep the angle
you plant the whips at, 6 foot (1.8 m) long whips will give you a structure 4 to 5 ft (1.2 to 1.5 m) high to the tips
and 8 foot (2.4 m) long whips will give you a structure 5 1/2 to 6 1/2 ft (1.7 to 2 m) high to the tips.


to do something a bit different – and here are a few ideas to help you.
Firstly, you might want to plant the whips further apart or closer together – just work out how many of which length of
whips you need and order those. You can leave the tips of the willow loose, or weave them together to make a flattened top edge to start with as above – but remember that you can weave in the new growth as it comes too, so your criss cross structure will become more dense, and there will be top growth too which should easily double the height of the structure in the growing season – but this top growth should all be cut back in winter to the original height . . . . . . . . . . unless you want to use some of the whips to, say, create extra height with arches . . . . or circular ‘windows’ . . . . . . Or ? ?
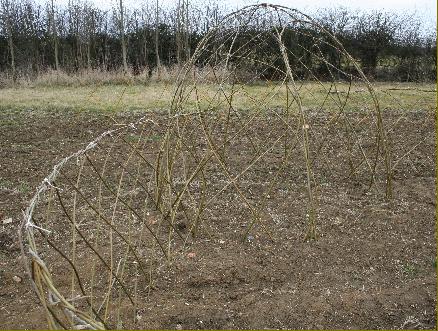
A standard Living Willow Dome Kit combined with 4 x Fedge A Kits to create an enclosed space/story telling circle - photographed as just planted.
as in the photograph on the right. The first photograph shows full summer growth – showing how dense the new
growth becomes – the second shows the younger growth back in the May of the same year. The unrooted whips
were planted in the winter a few months earlier. After leaf fall the original criss cross pattern will be seen, and
excess rods can be woven in or trimmed and used elsewhere.

If you don’t want a dense living willow divide in your garden, but something more open, how about little arches joined together to make a scalloped appearance by pushing both ends of a willow whip into the ground – Yes ! Both ends will root ! The photographs on the right shows them, as planted in January and below showing new growth in early May.
The new growth can be woven around the existing hoops or left until winter to be cut off.


To create this ………….. we find that it is best to cut the top tip of the willow whip off by about a foot (30 cm)
as this gives a wider point to push into the earth. Also, using two whips together gives a better appearance and is easier
to plant. We cut the tips off as mentioned above and then held the two whips together but the opposite way around – that is, butt end (thick end) to tip end – then wound them around each other and then, still holding them together at the end, pushed each end into the prepared soil by about 6 inches (15 cm). I found that 7 ft (2.1 m) long whips (then trimmed) would make arches about 18 inches high and 30 inches long (45 cm x 75 cm) – so an overlapping arched pattern as above would use 14 x 7 ft (2.1 m) long whips (ie 7 pairs) to cover a 10 ft (3 m) length. But – again – this is not the only way . . . . what would you like to make ?
We have the following living willow Fedge kits for sale
Fedge A Kit WK104A
Fedge B Kit WK104B
Fedge C Kit WK104C
Please visit our Living Willow Kit Prices page for full details.
Please see our FAQ’s page for further information and advice.